画三角形
上节已经会画线了,三角形还能不简单吗
假设我有ABC三个点组成三角形,我AB画一条线,BC画一条线,AC画一条线,结束!
= =目前写C处于UE和之前C风格的混沌叠加态了,能跑就行(不是
1
2
3
4
5
6
| void DrawTriangle(Point<float> A, Point<float> B, Point<float> C, TGAImage& Image, const TGAColor& Color)
{
DrawLineBresenham(A, B, Image, Color);
DrawLineBresenham(A, C, Image, Color);
DrawLineBresenham(B, C, Image, Color);
}
|
本节完!(不是
下一个问题是填充三角形
Fill三角形
那当然是先来一个最经典的从上到下或者从下到上的水平逐行扫描啦,简单直接=W=
1
2
3
4
5
6
7
8
9
10
11
12
13
14
15
16
17
18
19
20
21
22
23
24
| void DrawFilledTriangle(Vec2i T0, Vec2i T1, Vec2i T2, TGAImage& Image, const TGAColor Color)
{
if (T0.y == T1.y && T0.y == T2.y) return;
if (T0.y > T1.y) std::swap(T0, T1);
if (T0.y > T2.y) std::swap(T0, T2);
if (T1.y > T2.y) std::swap(T1, T2);
const int TotalHeight = T2.y - T0.y;
for (int i = 0; i < TotalHeight; i++)
{
const bool SecondHalf = i > T1.y - T0.y || T1.y == T0.y;
const int SegmentHeight = SecondHalf ? T2.y - T1.y : T1.y - T0.y;
const float Alpha = static_cast<float>(i) / TotalHeight;
const float Beta = static_cast<float>(i - (SecondHalf ? T1.y - T0.y : 0)) / SegmentHeight;
Vec2i A = T0 + (T2 - T0) * Alpha;
Vec2i B = SecondHalf ? T1 + (T2 - T1) * Beta : T0 + (T1 - T0) * Beta;
if (A.x > B.x)
std::swap(A, B);
for (int j = A.x; j <= B.x; j++)
{
Image.set(j, T0.y + i, Color);
}
}
}
|
在这节课里大佬给出了一个想法:
1
2
3
4
5
6
7
8
9
| triangle(vec2 points[3])
{
vec2 bbox[2] = find_bounding_box(points);
for (each pixel in the bounding box) {
if (inside(points, pixel)) {
put_pixel(pixel);
}
}
}
|
先找到三角形的包围盒,然后在对包围盒的每一个点判断是否在三角形之内,是的话就着色,最后画出一个三角形
这个被称为边界函数算法(Edge-Function)
在计算点是否在三角形内的时候使用了重心坐标系
这个算法猛地一看感觉很奇怪,这不是有很多像素根本不在三角形里,要去做判断不是一种浪费嘛,逐行扫描划出来的就是在三角形里的
主要原因是,扫描线画法通过插值生成两个边界点,插值的精度损失导致的多个三角形间存在接缝的问题。而绘制边界点之间部分,每次只画了一条线,操作的单位是一条线,现在基本都是高精度模型,这样画起来是很慢的,需要寻求一种可以并行的方法
对边界函数算法的实现如下:
1
2
3
4
5
6
7
8
9
10
11
12
13
14
15
16
17
18
19
20
21
22
23
24
25
26
27
28
29
30
31
32
33
| Vec3f Barycentric(const Vec2i Pts[3], Vec2i P)
{
const Vec3f U =
Vec3f(Pts[2].x - Pts[0].x, Pts[1].x - Pts[0].x, Pts[0].x - P.x) ^ Vec3f(Pts[2].y - Pts[0].y, Pts[1].y - Pts[0].y, Pts[0].y - P.y);
if (std::abs(U.z) < 1)
return {-1, 1, 1};
return {1.f - (U.x + U.y) / U.z, U.y / U.z, U.x / U.z};
}
void DrawTriangleEdgeFunc(Vec2i Pts[3], TGAImage& Image, const TGAColor Color)
{
Vec2i BboxMin(Image.get_width() - 1, Image.get_height() - 1);
Vec2i BboxMax(0, 0);
const Vec2i Clamp(Image.get_width() - 1, Image.get_height() - 1);
for (int i = 0; i < 3; i++)
{
BboxMin.x = std::max(0, std::min(BboxMin.x, Pts[i].x));
BboxMin.y = std::max(0, std::min(BboxMin.y, Pts[i].y));
BboxMax.x = std::min(Clamp.x, std::max(BboxMax.x, Pts[i].x));
BboxMax.y = std::min(Clamp.y, std::max(BboxMax.y, Pts[i].y));
}
Vec2i P;
for (P.x = BboxMin.x; P.x <= BboxMax.x; P.x++)
{
for (P.y = BboxMin.y; P.y <= BboxMax.y; P.y++)
{
Vec3f BcScreen = Barycentric(Pts, P);
if (BcScreen.x < 0 || BcScreen.y < 0 || BcScreen.z < 0) continue;
Image.set(P.x, P.y, Color);
}
}
}
|
背面剔除
通过定义一个光照方向(其实是视线方向),与每个平面的法向量求点积,点击结果意味着两个方向的夹角关系,可以得知是平行还是反方向,就可以完成背面剔除的工作了~
1
2
3
4
5
6
7
8
9
10
11
12
13
14
15
16
17
18
19
20
21
22
23
24
25
|
Vec3f LightDir(0, 0, -1);
for (int i = 0; i < ModelInstance->GetFacesNumber(); i++)
{
Face Face = ModelInstance->GetFace(i);
Vec2i ScreenCoords[3];
Vec3f WorldCoords[3];
for (int j = 0; j < 3; j++)
{
const Vec3f V = ModelInstance->GetVertex(Face[j]);
ScreenCoords[j] = Vec2i((V.x + 1.) * WIDTH / 2., (V.y + 1.) * HEIGHT / 2.);
WorldCoords[j] = V;
}
Vec3f N = (WorldCoords[2] - WorldCoords[0]) ^ (WorldCoords[1] - WorldCoords[0]);
N.normalize();
const float Intensity = N * LightDir;
if (Intensity > 0)
{
Vec2i Pts[3] = {ScreenCoords[0], ScreenCoords[1], ScreenCoords[2]};
DrawTriangleEdgeFunc(Pts, Image, TGAColor(Intensity * 255, Intensity * 255, Intensity * 255, 255));
}
}
|
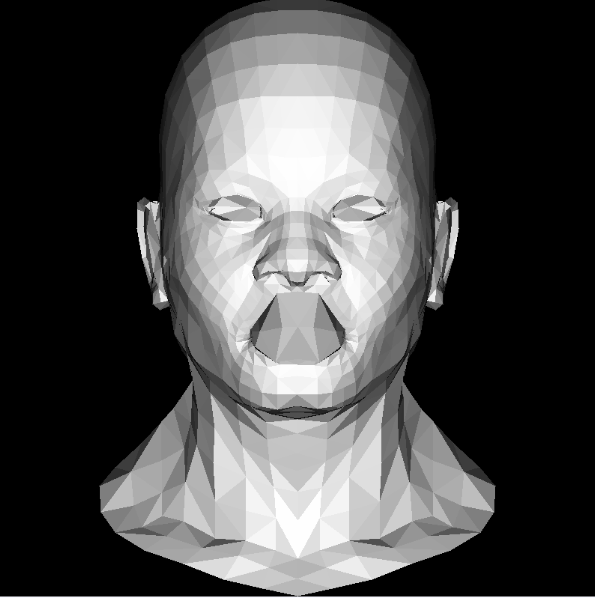
本节课结束之后会得到这样一张图:

可以看到嘴部是有点奇怪的,这个就是我们前面用的粗暴的剔除的方式导致的,嘴唇的一部分的法向量计算出来的结果并不是我们实际想要的“正面”的法向量方向,导致和光照方向点乘的结果是小于0的,认为是不可见的部分
这节到这里就结束了
